Building a USB Keyboard - Part 1
For a long time now, I've wanted to make my own keyboard. I don't know why, but it's been on my list of projects for a good 10 years now. Back then I didn't really have the confidence with electronics or the money to actually do it, so I ended up getting a Unicomp model M for the time being.
Now I'm moving to a new apartment and have a need that a custom keyboard could meet better than anything on the market, and it would be an opportunity to make some unconventional tweaks to the layout that suits my taste. In this first part, I'm just trying some basic things to get the feel for it.
1 The basics
So the first step for me was to decide on the architecture. I'm going to be ordering a 2-layer PCB, and the layout I want requires an area of about 350 mm by 120 mm with 96 switches. The traditional way of wiring up a keyboard is to make an X-Y matrix. And this would've worked, I could have made a 10x10 matrix, optionally with diodes to mitigate ghosting.
But I had made an attempt at laying out a keyboard before, and I didn't like the matrix style for some reason that I can't remember, so I decided to use shift registers. 12 of them to be precise. There's probably no good reason for it, but that's what I'm going for.
I also need to decide on a micro-controller. A popular choice seems to be the ATMega32u4, which has a built-in USB interface. However, ever since I read about V-USB, I've wanted to give it a go. I also have a thing for underpowered hardware, so in the end I decided to aim for an ATTiny 2313A. It has 2 kB of ROM and 128 bytes of RAM, of which I think the first 32 bytes are just the CPU registers. Not a lot, a base configuration Altair 8800 had more RAM than that, a configuration that was infamously useless. ROM is pretty tight too. So tight in fact that I ended up writing a mock-up of the software before I even put any money into hardware, just to make sure it can be done. It got really tight, but after moving my keycode look-up table into EEPROM (which is another 128 bytes of storage), I was able to squeeze it all in.
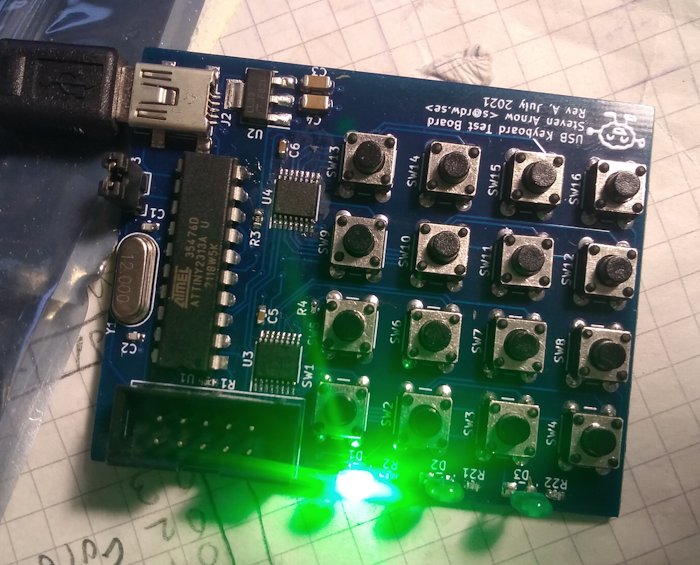
As a full-size PCB is a fairly big commitment, I decided to do a small-scale test first, and designed a 16-key mini-keyboard based on the same architecture, just to see that I wasn't overlooking something. A key quirk of the keyboard layout I want is that it changes the scancodes produced depending on num lock status.

Figure 1 - Overview of the test PCB showing the DIP-capsule microcontroller, mini-USB connector and 16 tactile switches.
Aside from some software issues, it all worked perfectly when I uploaded my code. My main issue, that I never resolved, was that I never got it to read data from the shift registers using the USI interface. I ended up bit-banging the shift-registers in software instead, which worked just fine.
2 Schematics
Below you'll find the 3-page schematics for this 16-key test board. At the bottom of this section you'll also find a link to the PDF version. Page 2 and 3 are more or less identical since I used the hierical schematics feature of KiCAD and organized them as one instance per 8 keys, in order to make it less tedious to multiply it up to 96 keys.
»»» PDF version of schematics «««
3 Source code
There really isn't much to the part of the source code that I wrote. However, since the V-USB library is only available as GPL without a commercial licence, for simplicity, I've made my portion of it GPL as well.
That's all for this time.
Comments belong to their respective owners. By posting a comment, you agree and give the right for slaeshjag.org to publish or reject it. Your e-mail address will not be published or disclosed to a 3rd party, and is only used for return correspondance or verifying requests to delete comments.
You need JavaScript enabled to post a comment